Saturday, December 31, 2016

English Paper Piecing by Machine

My mother is an amazingly talented quilter.  She finished a Passacaglia paper pieced quilt and it was juried into a special exhibit in Houston last fall.  I was standing there so proud to take her picture by her quilt when I fell in love with one myself.  Uh, oh.

So I decided to attempt my Ballet quilt (from Millefiori Quilts 2 by Willyne Hammerstein) by machine.  Hmm.....no way was I going to hand stitch them all together.

If you follow my blog you know that one of the things I love about it is attempting new things.

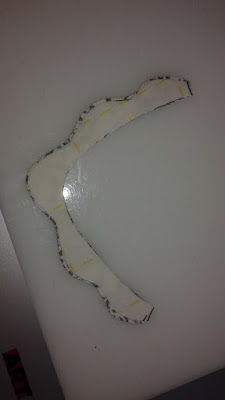
So, I started.  Here are a few photos of my first attempt.  The front looks great.  Pulling the paper that had been stitched through out?  Not so much.  I did decide that a single blanket stitch was the stitch that I wanted to use.


So now to attempt another one.

Here are the steps I used to make my pieces.  
1.  Decide which sides are going to be blanket stitched on.  Glue those to the back of the paper with glue stick.
2.  To get a line marking where the edge is on the other sides, I use a paintbrush to "paint" the seam allowances with starch, then fold them over and iron them dry with an iron.  Yes, this is a very tedious process, but I know exactly where that line is.

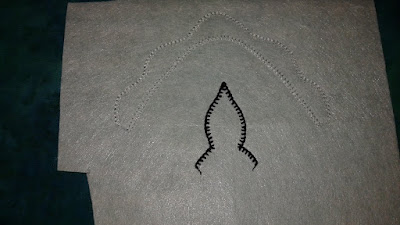
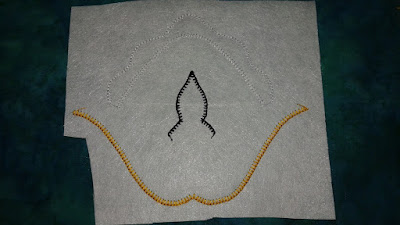
Now....putting them together.  Here you can see that back of a ten pointed star.  The only edges I've blued down are the ones that are now on the top that are going to be stitched.  The others have been starched for the line and then opened.  Now I am going to remove those papers before I stitch.  Since I did the starching I have the line where the edge of the piece will be.


Here is the second star I stitched.  The inner edges were stitched while the outer edges were left open and the next layer glued on top.  For example, those orange pieces are turned under towards the yellow, but left open under the purple and the purple is stitched onto the orange.  


Here is the back of the second attempt.  You can see that the yellow is open to sew the orange onto and the orange is open to sew the purple onto.  Sometimes I really had to think about what edges should be turned under.


Here is another picture where I've sewn the center star and laid the lime green pieces on top,  I then glued them down, pulled out the papers behind the lime green and then did a blanket stitch all the way around the edge.


Here is another picture of a star I've sewn together.  I used a 50 weight cotton Aurifil thread and you can barely see it.  My blanket stitch is about 1.5 by 1.5 mm.


I hope that makes sense!  Let me know if you have questions.

And I hope you get to quilt today!
Suzy

Friday, December 30, 2016

Free Motion Friday - Bubble Stacks

Okay, so let's be honest.  This design is not one of my favorites.  But I stitched it so I am sharing it with you all anyways!  I actually have two different designs on this rectangle as I changed it half way through so I liked it better.

The directions for the final design can be found here.  It's the one on the left below.


Stitching it the ditch around your rectangle.  Then start by making an oval about 1 inch wide and 2 inches long.  Then make a smaller oval and a circle inside it.


Repeat making ovals all the way across the block.


Here is one Bubble Stack complete.


The next thing I did was add these little ovals between the bubbles.  This is the part I turned out not to like.  I would just keep making stacks of bubbles and leaves these bubble out.  But it's your choice.


The thing I didn't like about the extra ovals is that it made it hard to make the next row of bubbles even.  The ends got a little wonky as I went between the ovals.


Here is the half I did with the ovals.  It's okay, but not my favorite.


So I decided to do the other side without the ovals.  These last three rows have no ovals between them.  I like it much better.


And here is the final design.


Sometimes you just have to go with your mistakes.

I hope you get to quilt today!
Suzy

Wednesday, December 28, 2016

Island Batik Ambassadors Tis' the Season for Giving

This month the Island Batik Ambassadors are doing a Tis' the Season for Giving challenge. Our directions were to make a quilt with our gorgeous Island Batiks to give away to a charity of our choice.


My quilt is just a top. How can that be you ask? Well, the charity I chose to give my quilt to takes tops, quilts them up, and then gives them to women and children in need. I decided to go with their flow instead of quilting it because after all, there are many quilters who love making tops out there and perhaps it will inspire them to donate tops!

The group I am talking about is a local guild called Quilt Dreamers. I have donated a lot of fabric when I've cleaned out my stash over the years, but never a top. Most of the quilts they make are bright and colorful and very kid friendly. I decided to do something a little more masculine because sometimes boys like calmer colors.


Once they are quilted they are given away to 360 Communities, a local organization. One of the schools I used to work in had a 360 Communities family liaison in our building. The liaison helped families with any needs they had at home as well as setting goals about schoolwork at home. They are a wonderful organization full of caring people who are committed to making our communities a better place for everyone. I see more of my quilt tops going their way in the future.

If you would like contribute a top to Quilt Dreamers please let me know and I will pass along the contact information to you!

I hope you get to quilt today!
Suzy

Monday, December 26, 2016

Snowman Inspiration

I got a chalkboard snowman from my secret santa at work this year.  I wasn't quite sure what I was going to do with it until I realized I could draw quilting patterns on his tummy....I hope you had a Merry Christmas!


I finally have enough energy that I get to quilt today!  I hope you get to quilt too~
Suzy

Saturday, December 24, 2016

Black and White Flower #18 - the last one!

I can hardly believe this is my last Black and White Flower to share!  I had some trouble with this one.

Here are the fabrics I picked out at first.  I decided the orange background with the tear drops really didn't work.  It doesn't have enough contrast with the darkest orange.


So I tried this light yellow instead.  I had fun fussy cutting it.


Once I put the flower on the teal background I realized that the white was a bit transparent.  So I added an extra layer of white fabric and fusible.  You can see how I did it below.  I cut a piece about 1/16 inch smaller than the original.


Hereis the first layer all stitched up.


And the back.


Layer Two.


And the back.


The final block.


And the back.


Now to put the quilt together!

I hope you get to quilt today and for those of you who celebrate the holiday, Merry Christmas Eve!
Suzy

Friday, December 23, 2016

Free Motion Friday - Double Arches

I've decided to call the design for today Double Arches.  You can easily do it as single arches, but the doubling makes it easier to see.  However, if you're going to do it small as a background filler singles could be faster.

The written directions can be found here.

Start by stitching in the ditch around your block.  Then make an arch of any size.  Echo the arch 1/4 inch away from the original arch.


Backtrack to where you want to start your next arch and make another.  Then echo it.  Repeat this process.


One thing I tried to think about as I was making this pattern was to alternate which way the arches were going.  Sometimes I made them left, sometimes right,   I also alternated sideways and upside down too just to make it more free form.


And the final results.  I love this one and can't wait to use it!


I hope you get to quilt today!
Suzy

Wednesday, December 21, 2016

Black and White Flower #17

I'm getting close to being done!  This flower and one more!  And only one more day of school before winter break!

Each of the petals on this flower was cut from the same multi color batik.  It's fun to see how the different petals turned out.


Here's the back.  In order to stitch the petals in succession I would stitching a straight line to where I wanted to start the blanket stitch up again.  Then stitch over that with blanket stitch covering it up.


And the final block.


And the back.  There were a few black thread bobbles.


I hope you get to quilt today!
Suzy

Monday, December 19, 2016

Earring Inspiration

Well we survived the -23 degree morning!  We blew bubbles outside (the kind you give kids in the summer) and watched them freeze.  Then you could catch them and watch them split in pieces.  It was a blast!

One of my coworkers was wearing these earrings the other day.  They would make a fabulous quilting pattern!


And just to remember that at the beginning of December, a few mere weeks ago, here in Minnesota some of the early spring flowers were blooming!  They were as confused as we were.  Though I'm glad it's supposed to be warmer tomorrow so that I can take my third graders out for recess.  20 degrees actually sounds good!


I hope you get to quilt today!
Suzy

Saturday, December 17, 2016

Black and White Flower #16

I made it through my work day.  My boss was kind enough to let me go early since my prep time is at the end of the day.  We're due 10-12 inches of snow here followed by a frigid night of -20 tomorrow evening.  We're all stocked up and not planning on leaving the house until Monday!  And I have lots of sewing to do!

Without further ado, here's Black and White Flower #16.  This is one of my favorites because of the five red leaves that stick out the top.  I had a blast fussy cutting some fan fabric to fit in those leaves.  Such fun!


The back of layer one.


Layer two and all done!


The back of the final block.


I hope you get to quilt today and if you're in the frozen north like me I hope you stay warm!
Suzy

Friday, December 16, 2016

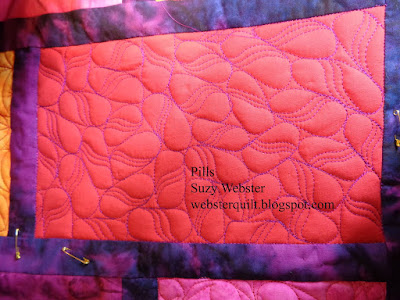
Free Motion Friday - Pills

It's going to snow here in MN.  And by snow, I mean we are expecting 8-11 inches at my house followed by temperatures Saturday evening of -19 degrees.  Yes.  -19.  You read that right.  Time to quilt!  No way am I leaving the house.  Yes, going to see Rogue One is tempting, but not in temperatures like that.  It can wait a few days.


Since my son and I have been home sick with a virus the last few days it seems appropriate that this week's design is called Pills.  We debated on other names, but in the end, that is really what they look like.

Written directions for this design can be found here.

Start by stitching in the ditch around the block.  Then make a pill shape about 1 inch wide by 2 inches long.


Stitch an elongated S shaped line through the pill as shown below.


Stitch up 1/8 inch along the outside edge then echo your first s line.  Then add a third line.


Stitch along the oustide until you get to the spot where you want to start your next Pill.  Here are a few pills all stitched up.


Here we are about 1/2 of the way through.


And the final result!  I think it's a lot of fun.


I hope you get to quilt today!
Suzy